Part 3: Re-architecting the system to use a messaging integration style
In this series of posts I am taking a practical look at how a messaging architecture can mitigate the risks associated with a spike in load if a server doesn’t have enough resources to handle the spike. In Part 1 I created a distributed system for a fictitious company. The system consisted of two nodes: an inventory node and a purchasing node. These nodes were integrated using an RPC-style architecture. In Part 2 I put the system under stress using a Visual Studio Load Test and saw how it failed when the virtual machine on which the purchasing system was deployed didn’t have enough resources to handle the load. In this third post I am going to use a messaging integration style over RabbitMQ to allow this distributed system to effectively handle spikes in load. Finally, in Part 4 I am going to simulate the same spike in load and see how the messaging architecture comfortably handles the spike.
Messaging and RabbitMQ
An RPC-style architecture can be very appealing. On the surface, RPCs appear to be the same as in-process calls. They appear to behave in the same way. You make a call and receive a response all within a few lines of code. But despite this appearance they are actually quite different. The idea that RPCs are the same as in-process calls running on the same box is an illusion that is made evident when examining the 8 Fallacies of Distributed Computing. If you are not already aware of the fallacies it would be worth your time to read up on them. As we saw in Part 2 of this series, RPCs are prone to failure. They tightly couple systems together. If one application fails it can bring the entire system down. RPCs are also much slower than in-process calls. All of these difficulties call for a different integration style; one that can operate effectively within the troublesome environment of a distributed system.
This is where the messaging integration style comes in. Messaging is an asynchronous integration style that, depending on how it is implemented, does not necessarily require both applications to be up and running at the same time. Messages can be queued while a target application is offline and then these messages can be processed as soon as the target application comes online again.
RabbitMQ is a high-performance, open source message queuing technology built on Erlang. It includes a .NET client library and we’ll use this library to allow our two applications to send and receive messages with RabbitMQ over AMQP. Let’s modify our distributed system to use messaging as the integration style and see what effect that has when we put the system under load.
Updating the architecture
In our current architecture the two applications, inventory and purchasing, communicate via RPC calls. When inventory levels drop too low, the inventory application asks the purchasing application to purchase more stock. In our new architecture, the inventory application will no longer call the purchasing application directly. Instead it will send a message to RabbitMQ when the inventory level drops. The purchasing application will then receive the message from RabbitMQ, process it and carry out the purchase order.
There are a few steps we need to take to update our architecture to use RabbitMQ:
- Install and configure the RabbitMQ Server on the purchasing application server.
- Update the inventory application to post messages to the queue rather than make an RPC call to the purchasing application.
- Update the purchasing application to read messages from the queue.
Let’s take a look at these steps one at a time.
1. Install and configure RabbitMQ
The first thing we need to do is install the RabbitMQ Server on our purchasing application server. The RabbitMQ website will walk you through the process. Be sure to enable the Management Plugin. This plugin provides a browser-based UI that is useful for interacting with your queues.
Our inventory application will need to be able to send messages to RabbitMQ so we’ll need to open up a port through the firewall. Create a new inbound firewall rule allowing connections through port 5872 (the default RabbitMQ port).
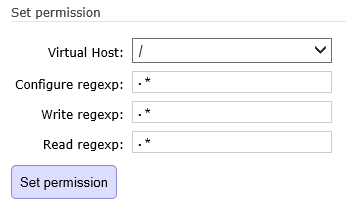
The final thing we need to do is create a RabbitMQ user that our inventory application can use to connect to RabbitMQ. In the RabbitMQ management UI, click on Admin and create a new user with the username “admin” and password “admin”. Once the user is created, grant it access to the virtual host “/”:
You should now have a new user that the inventory application can use to connect to RabbitMQ:
2. Update the inventory application to post messages to RabbitMQ
At this stage, the inventory application contains a class called StockManager with a RequestStockReplenishment method. This is the method that makes the RPC call to the purchasing application. Let’s update this method so that it no longer makes an RPC call but rather places a message to a “stock-replenishment-requests” message queue on RabbitMQ.
RabbitMQ provides an officially supported client library for .NET. Go ahead and add a reference to this library by installing the RabbitMQ.Client NuGet package to your Enterprise.Inventory project:
install-package RabbitMQ.Client
With the package installed, we need to establish a connection to RabbitMQ (using the IP address of the server on which RabbitMQ is hosted), create a new queue (an idempotent operation) and publish a message to the queue. To keep things simple, the message body will just consist of the item code of the item we need replenished.
This is what our updated StockManager class looks like:
public class StockManager
{
    public void RequestStockReplenishment(string itemCode)
    {
        const string QUEUE_NAME = "stock-replenishment-requests";
        var messageBody = Encoding.UTF8.GetBytes(itemCode);

        var factory = new ConnectionFactory
        {
            HostName = "192.168.1.166",
            UserName = "admin",
            Password = "admin"
        };

        using (var connection = factory.CreateConnection())
        {
            using (var channel = connection.CreateModel())
            {
                channel.QueueDeclare(
                    queue: QUEUE_NAME,
                    durable: false,
                    exclusive: false,
                    autoDelete: false,
                    arguments: null);

                channel.BasicPublish(
                    exchange: string.Empty,
                    routingKey: QUEUE_NAME,
                    basicProperties: null,
                    body: messageBody);
            }
        }
    }
}
3. Update the purchasing application to read messages from the queue
The final step in this process is to create a queue handler that our purchasing application can use to accept and process messages from the queue. In a production application this would most likely be a Windows Service but for this test I will just create a console application.
The purchasing application already has a PurchaseOrderStore class that submits purchase orders. In our case, “submitting a purchase order” is simulated by writing the item code to a text file. Our queue handler console application will receive a message from the queue and call into the PurchaseOrderStore to submit a purchase order for the item code contained in the message.
I am going to create a new console application called Enterprise.Purchasing.QueueHandler, add the RabbitMQ.Client NuGet package to the project and place the following code in the Program.cs class:
class Program
{
    static void Main(string[] args)
    {
        const string QUEUE_NAME = "stock-replenishment-requests";

        var factory = new ConnectionFactory
        {
            HostName = "192.168.1.166",
            UserName = "admin",
            Password = "admin"
        };

        using (var connection = factory.CreateConnection())
        {
            using (var channel = connection.CreateModel())
            {
                var consumer = new QueueingBasicConsumer(channel);
                channel.BasicConsume(
                    queue: QUEUE_NAME,
                    noAck: true,
                    consumer: consumer);

                Console.WriteLine("Waiting for messages.");
                var purchaseOrderStore = new PurchaseOrderStore();

                while (true)
                {
                    var basicDeliveryEventArgs = consumer.Queue.Dequeue();
                    var body = basicDeliveryEventArgs.Body;
                    var message = Encoding.UTF8.GetString(body);

                    purchaseOrderStore.SubmitPurchaseOrder(message);
                    Console.WriteLine("Handling message: {0}", message);
                }
            }
        }
    }
}
Wrap-Up
With these changes done we have completed the move from an RPC-based integration style to a messaging-based integration style. In the final post of this series we are going to test this new architecture and see how it holds up under load.
You can download all the source code for this series from this GitHub repository.


